In this comprehensive guide, we will talk about Graduated Neutral Density Filters for landscape photography.
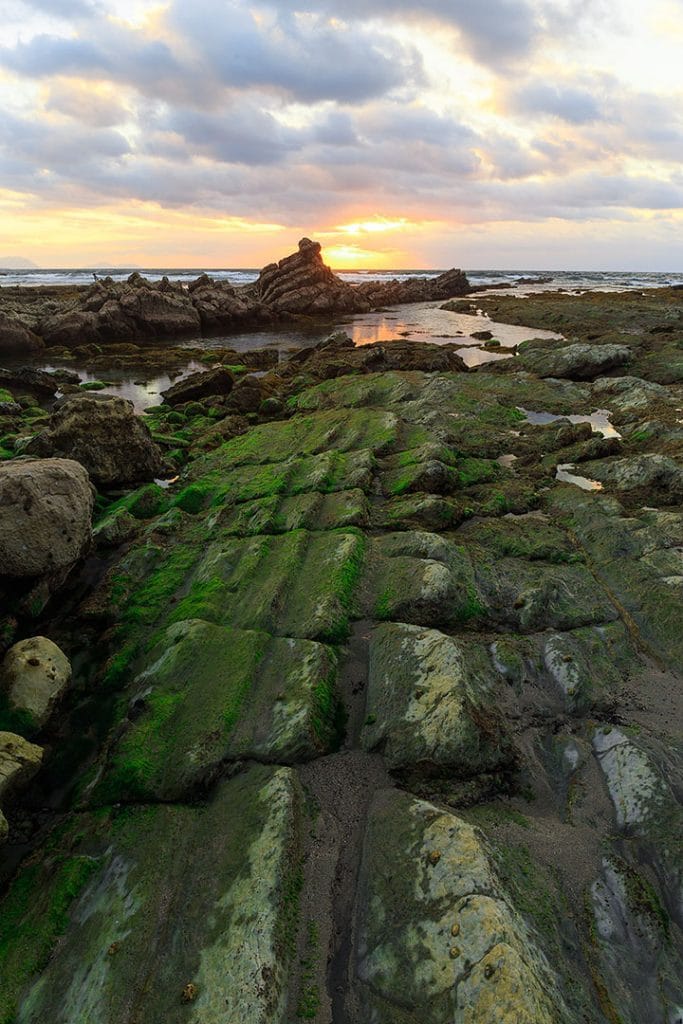
There is a common situation when taking pictures of the landscape: we shoot a beautiful sunset view, and instead of the sky in the picture – just a white spot. Or vice versa – the sky is exposed correctly, but only black spots are left in the foreground.
This problem is the uneven illumination of these parts of the frame: the sky is much brighter than the foreground.
And if our eyes can see the whole scene, the camera displays it differently. The dynamic range of the camera is not infinite – sometimes it is not possible to capture in one photo the whole set of the brightness of the selected scene.
The sun makes a landscape picture so contrasting that modern sensors cannot record all the magnificence that the eye can see. That’s when graduated ND filters save the situation.
Neutral filters, reduce the amount of light that enters the camera. ND filters make it possible to open the aperture wider and reduce the depth of field, clearly separating the subject from the background and maintaining detail.
Most photographers have these filters as standard accessories.
But in recent years, there has been a growing debate about the need to use Graduated Neutral Density Filters.
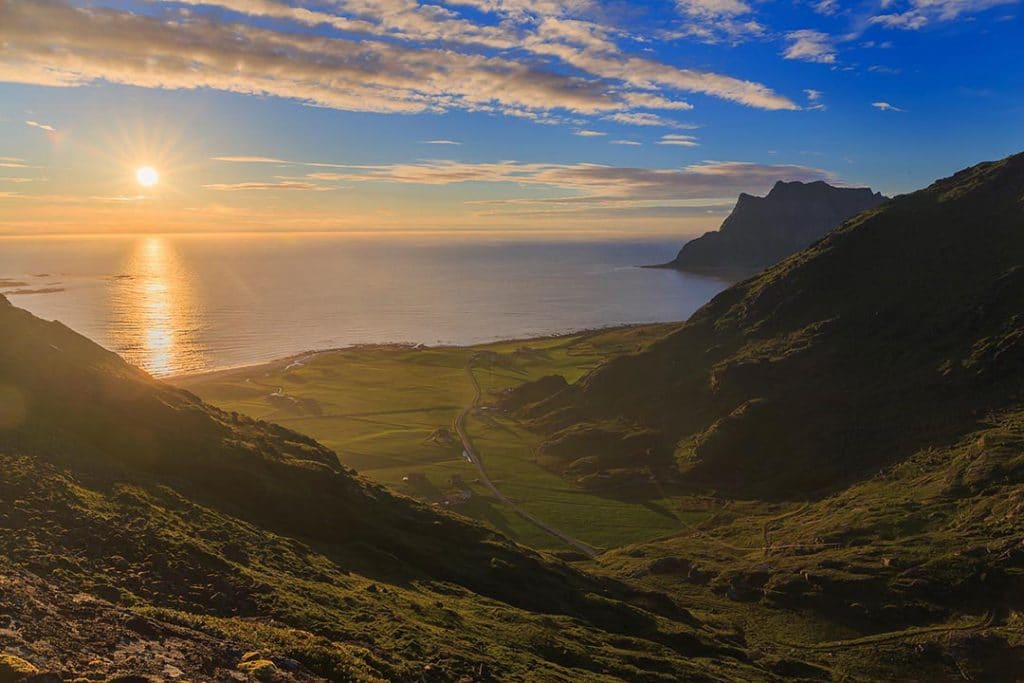
Table of Contents
- FILTER OR PHOTOSHOP
- WHAT IS GRADUATED NEUTRAL DENSITY FILTERS
- VARIETY OF GRADUATED NEUTRAL DENSITY FILTERS
- WHICH ND GRAD FILTER SHOULD I CHOOSE
- TYPE OF GRATUATED NEUTRAL DENSITY FILTERS
- MOST USED GRADUATED NEUTRAL DENSITY FILTERS
- HOW TO USE GRADUATED NEUTRAL DENSITY FILTERS
- 3 WAYS TO SAVE DETAILS
- HOW TO REPLACE THE GRADUATED NEUTRAL DENSITY FILTER DURING POST-PROCESSING
- ND GRADS VS HDR
- IMAGE POST-PROCESSING
- SUMMARY
Filter or Photoshop
Many experts raise the question of whether the Graduated Neutral Density Filters is needed, in principle.
You can take several photos and then “mix” them with a program, such as Photoshop, or create an HDR, which allows you to show all the shades of light and shadows of the scene.
This is, for the most part, a question of personal preferences, and the ability to “switch” between the tools distinguishes a professional photographer who can think big.
When shooting in the “gold watch” (time immediately after sunrise or during sunset), I almost always use the Graduated Neutral Density Filters. And I prefer to shoot the cityscape with a few shots, which I then combine.
There’s a good reason for this approach. In the “Golden Hour,” you need to save all the details of light overflows in the sky, and you can set the settings once and then use the filter.
When shooting a cityscape, I have a problem. Buildings have different heights; sometimes, a narrow street is framed with buildings. You cannot use Graduated Neutral Density Filters under these conditions.
If there is something too bright in the foreground, there is a risk of “overexposing” the scene. It’s better to take three photos. On one of them, the sky will turn out well, and on the second – sunlit buildings, and the third frame I correctly expose the shadows. Then it can be combined into Photoshop or Lightroom.
There are cases when you cannot replace ND Grad with anything. To shoot smooth, silky sea waves or a river with soft and white lambs, you need to use them, because you can’t exactly reproduce the effect during editing.

Also, the Graduated Neutral Density Filters need a long exposure during sunset or sunrise. Light conditions change very quickly. And you won’t have time to shoot three frames with an exposure bracketing. It will be night or dawn.
What is Graduated Neutral Density Filters
Such filters are a piece of glass or plastic with a grad from light to dark. Neutral they are called because the tonal coating on the filter does not add any additional color or shade to the scene you are shooting.
Photographers use graduated ND filters to properly expose the light and not overexpose the brighter part of the photo and correctly expose the foreground.
Without them, in some cases, it is difficult to work: if you set the settings for nearby objects, the sky is over-exposed.
If you focus on the sky, the foreground will be dark.
You can process images in Photoshop, but filters make it easier to capture all the details of the scene. Also, the post-processing time will be significantly reduced.

Variety of Graduated Neutral Density Filters
The Graduated Neutral Density Filters marked as GND or ND Grad – Neutral Density Graduated.
In addition to neutral graduated ND filters, there are also color filters (for example, sunset to turn the day sky into a kind of sunset). Color filters give very rough effects in the photo. They can be easily imitated by processing if you want.
In modern digital photography, color filters are practically not used.
Neutral Graduated ND filter is available in several form factors.
The first is the usual round graduated ND filter, which is screwed onto the lens. The position of the grad on them is fixed, and the filter begins to dictate the composition of the frame: the sky should be where the grad is, and no other way.
If you want only a piece from the sky at the top of the frame, or, on the contrary, you want to leave only a small strip from the ground at the bottom, then in such cases, the round ND graduated filter will give nothing but additional problems.
Another format is convenient for working with graduated ND filter – system filter-plates.
by NiSi
They are available in various sizes and form factors, but the most common standard of such filters – the plate size of 100 x 150 mm and a thickness of 2 mm. For such filters, they are using a special holder, which can mount on virtually any lens with the appropriate adapter, screwed into the thread of the lens.
In the case of 100mm plates, the filters and holders of different brands are compatible with each other. The advantage of this system is its versatility: you can insert filters for any purpose into the same mount and combine them.
See also: Neutral density filter guide
As a rule, the holder allows 2-4 different filters to be mounted at once. And since you can move and rotate the filters in the holder, you can always find the position of the filter in which the darkening is optimal.
For ultra-wide-angle optics with a convex front lens, such as AF-S NIKKOR 14-24mm f/2.8G ED, you can also use system filters, but wider – from 150 mm in width, plus you need a special holder and adapter for the specific lens model.
One of the advantages of the Nikkor Z 14-30mm F/4 S. This compact wide-angle mirrorless Nikon Z is the shortest full-frame lens with a filter thread.
And if you have a thread, you can also add a filter holder – the Nikkor Z 14-30mm F/4 S works excellent with 82mm threaded filters as well as relatively inexpensive and common 100mm system filters.
The system graduated ND filter differs in the degree of darkening and the grad transition configuration.
The degree of darkening of graduated ND filter is characterized in the same way as in solid ND filters, which I wrote about last time. The only difference is that the maximum darkening is achieved at the top, darkest, part of the filter.
After marking ND (or GND), it is written how many times the filter cuts off the light flow in its densest part.
For example, GND32 cuts off the light flux 32 times, which corresponds to a decrease in exposure by 5 f-stops. And on a traditional scale of the density of such a darkening corresponds to the value of 1.5.
Different manufacturers may specify filter densities in different units. So I made this cheat sheet for comparison.
Let’s duplicate the table with a different indication of the degree of a blackout that can be found on the filters. (Tab. Density and marking)
Unlike solid ND filters, graduated ND filters with a higher darkening than ND32 and ND64 are not produced. The darkening in the frame will be too big; part of the image will remain black.
WHICH ND GRAD FILTER SHOULD I CHOOSE
As for the manufacturers of ND Grad filters, you should remember that a good filter will be cheap. It is not for nothing that such graduated ND filters are called neutral gray – they must not distort colors! Naturally, dirty graduated ND filters change colors.
During processing, it is challenging to correct shades distorted by such filters because they are changed as the grads increases.
Among manufacturers, with a good reputation, we should mention brands NiSi, Formatt, Hitech, Haida.
Most companies produce filters out of plastic, not optical glass. It is cheaper. However, the optical properties of such filters are worse and scratching it is more comfortable, it attracts dust.
The cost is the main plus of filters made of plastic since the price of some glass filters can reach several hundred dollars for a single filter.
Plastic filters are almost impossible to break.
Therefore, if you are not burdened with an extra pair of thousand dollars, the plastic filter is the only alternative for you.
TYPE OF GRADUATED NEUTRAL DENSITY FILTERS
In addition to the degree of darkening, the graduated ND filters differ in the configuration of the grad itself.
Soft-grad
The most common type of graduation is Soft-grad. This implies a smooth transition from the dark part of the filter to the transparent one.
Soft-grad is the most practical and versatile type of graduated ND filter. It is good because you can buy a high-density filter and simply lower it in the holder to the desired position. If, however, this filter provides excessive darkening from the top, it can be easily compensated for by the software ND graduated filter.
Based on practice, the optimal exposure difference between the sky and the ground is on average about 3EV; the most popular in my arsenal is the ND8 grad. If I shoot even more contrast scenes, I use the ND32.
Hard-grad
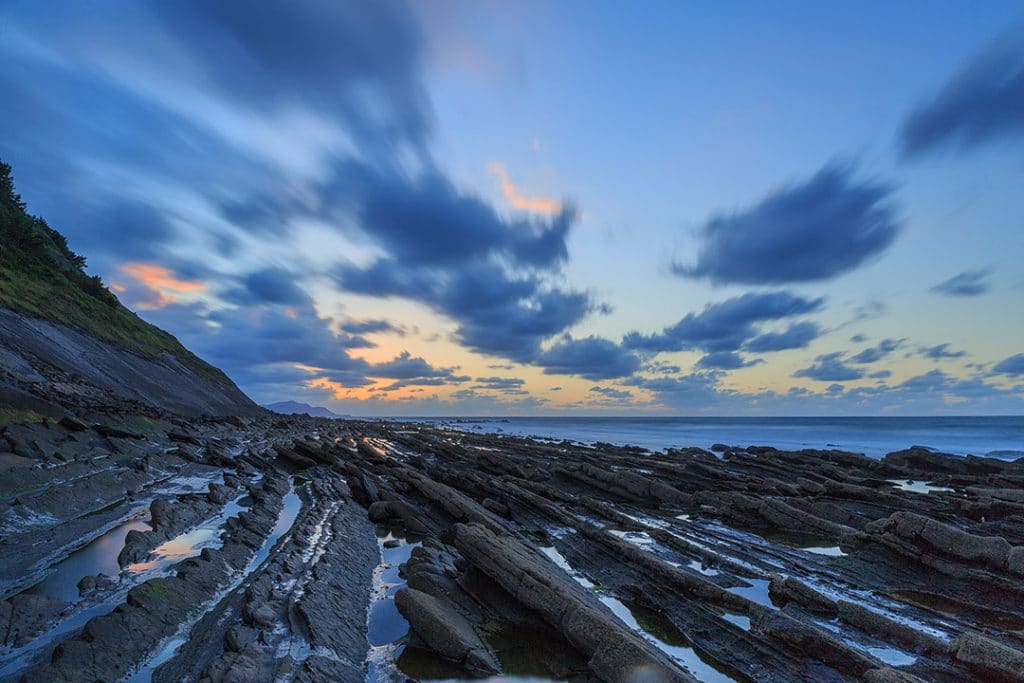
There are also filters with a shorter, tougher grads transition, and this is Hard-grad.
Such filters are mainly needed where there is a clear horizon line (for example, to capture the sea). The Hard-grad filter must not be too dark, otherwise, it will give a very unnatural dark transition, which will take time to correct.
Reverse ND Grad
Reverse ND Grad is like Hard-grad.
These filters have an inverse grad: there is a rigid boundary in the middle, and the top grads become more transparent. Perhaps, the filter is used only for shooting sunrises over the sea. A filter can easily replace it with a regular hard-grad.
Medium grad
Some manufacturers also produce other configurations of graduated ND filters, such as those with a medium-graduation (Medium grade).
The transition of these filters is something between a hard and a soft-grad. Such a filter is used for shooting in hilly terrain, where there are small elevations above the horizon.
MOST USED GRADUATED NEUTRAL DENSITY FILTERS
Despite the abundance of configurations, perhaps the most universal graduated ND filter is ND8 soft grad. After that, you can gradually complete the set.
Some suggest starting with less dense ND2-ND4 type filters with soft grads.
This is a good idea if you don’t plan to process the photo after shooting.
Besides, the dynamic range of the modern camera sensor can cope with the difference of one or two f-stops.
Denser filters may require a little fine-tuning of the result when editing, clarification of the areas above the horizon line.
Recommendation
You can’t buy one filter. These filters are sold in kits and your initial investment will be very high.
I currently recommend NiSi filters.
Yes, yes, I remember, I’ve always been a Lee fan. But nevertheless, the guys at NiSi have achieved impressive results and the quality of their filters and accessories are of comparable quality at more than a third less cost.
Well:
- 100mm Starter Kit III with V6 Filter Holder and Enhanced CPL. It’s the perfect choice for those who want to buy all the filters they need at once and start shooting right away. In addition, buying a set will save you money as if you were buying everything one by one.

HOW TO USE GRADUATED NEUTRAL DENSITY FILTERS
When to use Graduated Neutral Density Filters
Most landscape photographers use ND filters also during the golden hour – at dawn or dusk. During the day, they are useful for slowing down the shutter speed so that, for example, the water looks smooth and silky.
ND filters are also helpful for blurring moving objects such as people, cars, trees that are swaying in the wind. The result is a day scene with well-defined details and dynamic elements.
See also: What is Polarizing Filter and how is it userful
ND Grad filters are useful for smoothing out the difference between the sky and the foreground. If it exceeds two stops, you can get a well-balanced exposure by applying them.
It’s not dogma, but if you take a shot and find the sky too bright and the foreground too dark, it’s time to buy a filter.
The practice of working with Graduated Neutral Density Filters
Using an ND graduated filter is intuitive. Simply insert it into the holder and adjust it so that it only affects the light part of the frame.
The system graduated ND filter with soft transition is convenient because we can adjust the degree of sky darkening by raising or lowering the filter in the holder.
For natural darkening, set the filter so that the densest part of it does not fall into the frame. And if you want to darken the sky harder, lower the filter harder.
This way, even relatively dark filters, such as ND8 or ND32, can be applied to the picture, not at their full strength.
How do you check if the sky is dark enough
It shouldn’t have any overexposed areas knocked out in white, except for the solar disk. The overexposed spots are easy to see on the histogram or in the “overexposure” view.
If you have several graduated ND filter and you don’t know which one to use in a given situation, you can switch the camera to spot metering, measure exposure from the sky and foreground, and then calculate the difference between them in EV.
Experience suggests that this difference will be within 2-4 f-stops.
The appropriate filter is worth using. However, which filter to use is easy to determine by eye.
If there is no brightness difference at all and the day is cloudy, you do not need a filter at all. If the difference is not high, there is no sun in the frame. The ND8 filter will do.
If there is bright dawn or sunset before us, you may use an even denser filter, for example, ND32.
If the border between the sky and the tops is not horizontal but inclined when shooting in the mountains, you can set the ND graduated filter not strictly horizontally but tilted.
Lofoten Islands. Photo and Travel Guide. Second Edition 2020. PDF e-book
Lofoten is an inexhaustible source of inspiration for artists and photographers around the world. I wrote this manual to share my Lofoten travel experience with you. I’d be very glad if this book helps and inspires you to create new amazing photos.
You can apply several filters at once to increase the degree of blackout. Besides, the second filter can darken the foreground if necessary – it is enough to set it inverted.
It is also possible to use graduated ND filters when taking pictures of the open sun at sunrise or sunset. But at the same time, it is worth remembering that the filter can produce significant glare.
Therefore, when choosing a filter, make sure that it has a high-quality multi-layer anti-reflective coating, which reduces the number of “sun glare” to a minimum.
It is also essential that the filter, like the lens, is perfectly clean: any mote on the glass will turn into a significant glare.
There should always be a microfiber cloth to clean the optics. It will also help when shooting in the rain, near a waterfall, when the optics are splashed with water.
Step-by-step tutorial
- Shooting in manual mode. Use graduated ND filter to shoot in manual mode. If this filter is installed on the lens, the camera will likely have problems with standard exposure detection.
- Manual focus. In most cases, the camera autofocus works correctly. But if it is not, use an aperture value of f/11-16. Sharpness should be pointed at the subject that is about one-third of the distance from you to the last subject that has value in the photo, for example, to the horizon line. For efficient and quick sharpening and to avoid mistakes, use pre-prepared tables or use a calculator to determine the hyperfocal distance, which will allow you to use the maximum possible depth of sharpness. Don’t rely on your memory and ingenuity, especially at first, use tables, and it will make your life much easier!
- Measuring light levels. Use the entire image area to estimate the exposure correctly. For this purpose, the estimation or matrix method of exposure estimation will be suitable. Other modes are not suitable, as the camera may be very wrong because the parts of the frame are too light.
- Reading the histogram. Take a test shot. You need to make sure that the graduated ND filter used to reduce the tone range to such an extent that overexposed spots in the light area and “gaps” in the dark area of the image disappear. If your histogram starts far from the right side, the filter density is likely too high for this shooting situation.
Process using ND graduated filter
There are several stages:
- Set up the camera on a tripod and set up the settings in the front plan;
- Measure the exposure across the sky;
- Reduce parameter differences with the ND Grad filter so that there is no more than one f-stop between parts of the scene. For example, if the sky is three f-stops brighter than the foreground, you should use ND Grad 0.6 to block two f-stops;
- Install an ND Grad filter in front of the lens and determine the best position for the grad, select a hard-grad (e.g. for sea photography) or a soft-grad;
- Measure the exposure for the front edge and take a picture;
- Make adjustments after viewing the results, if necessary.
You will certainly have to practice, but the result is worth it.
3 WAYS TO SAVE DETAILS
There are many ways to save all the details and colors in a photo. Let’s take a quick look at the basic ones.
Shooting in RAW
Shooting in RAW with under-exposure.
The RAW format is designed so that parts from dark areas are lightened up, but overexposed parts are barely exposed. So you can take a deliberately dark frame to lighten it up while processing while keeping the details in bright areas.
However, this simple method is fraught with the appearance of digital noise in the photo, which the more.
See also: Aperture and f-stop in Landscape Photography
But, if you own a modern full-frame Nikon or Canon camera with a wide dynamic range, such as the Nikon D850, Nikon Z 6 or Nikon Z 7, Canon 5D Mark IV or Canon’s next-generation mirrorless cameras, you can safely use this method in many scenes.
Shooting with exposure bracketing
Shooting with exposure bracketing and subsequent HDR stitching or mask fusion in Photoshop.
The essence of the method is simple: you need to shoot several frames of different exposures so that in the darkest of them are preserved light areas, and in the lightest were worked out details of the darkest parts of the scene.
Then all frames of the series are stitched together on the computer. This method allows you to expand the dynamic range of the scene at least to infinity and is often needed when shooting the most contrasting scenes.
But, it has an Achilles’ heel: objects in the frame should not move. Otherwise, the shots may not stick together properly.
Practice shows that in the most spectacular natural conditions, there is too much movement to create HDR, so this method is not always suitable. The HDR method is mainly useful for architectural photography of urban scenery.
You may notice that the above methods are associated with serious processing and even gluing together several frames.
Processing is always a big waste of time and a potential opportunity to get a technical error at any of the stages. But there is also a more organic way to save all the details in a frame.
Using Neutral Density Nd graduated filter
Shooting using Neutral Density Nd graduated filter.
The essence of the filter is that in the upper part of its darkening is stronger, and to the bottom, it gradually disappears.
In this way, you can darken the sky and leave the bottom bright enough. Also, the use of ND graduated filter can be combined with any of the methods described above!
HOW TO REPLACE THE GRADUATED NEUTRAL DENSITY FILTER DURING POST-PROCESSING
Can I replace the optical Graduated Neutral Density Filters during post-processing? A reader familiar with processing programs may well ask this question because Adobe Lightroom has a software ND graduated filter; why else would there be glass?
If in the RAW file the parts in light areas were lost, it will not be possible to return them in the photo using the program ND graduated filter. The maximum you will achieve is that the white spots in the photo will become grey, which is even worse.
Software graduated ND filter that is available today in any advanced RAW processing program (e.g. Adobe Lightroom Classic, Adobe Camera Raw, PhaseOne Capture One, Skylum Luminar). They only work with the details that are present in the original frame.
There are no details in the overexposed areas, so you can’t even pull anything out of there. Yes, the program graduated ND filter will be useful in our work too, but about this a little bit lower.
ND GRADS VS HDR
Let’s add that when it comes to shooting scenes with dazzling bright sun, you can shoot without filters at all by resorting to HDR shooting. The close protection of modern lenses is perfect enough to get a high-quality contrast shot with minimum glare in such conditions.
ND Grad filter is difficult to use in scenes where you’re shooting through some significant framing element against the sky or the sun disk.
For example, if the branches of a tree occupy a significant part of the top of the frame, then when using the ND graduated filter, they will have a maximum blackout and only silhouettes will remain in the photo.
The same applies to the shooting of high-rise buildings, significantly protruding above the horizon line.
In such cases, it makes sense to use shooting with exposure bracketing for further HDR creation.
If the objects in the frame, protruding above the horizon line, turned out to be unnaturally darkened when using dense graduated ND filter such as ND8 or ND32, it is enough to impose on them a program gradient during image processing.
This can be done in any advanced RAW converter or Adobe Photoshop. And to prevent the sky from being illuminated, all you need to do is adjust the brightness mask. With masks of brightness, today can work Lightroom, CaptureOne, Photoshop.
See also: The Northern Lights of the Lofoten Islands
Let’s talk about the application of a lightening gradient with a brightness mask in Adobe Lightroom. The grad increases exposure by +1EV (the setting is highlighted with a blue frame).
To make this setting affect only dark areas, and no effect on the light sky, turn on the brightness mask (Range Mask – Luminance) and use the Range slider to select the brightness that the mask affects.
To visually display the mask, you can check Show Luminance Mask (or press the hotkey O) – the areas affected by the mask will turn red.
The main tasks in advanced photography are to get both a beautiful frame from the camera and a high-quality source, which can then effectively “show” in future work.
Graduated ND filter is designed to help solve such problems. They make it easy to avoid backlights and blackouts by shooting in one frame without bracketing or other complicated techniques.
The result of their competent application will look organic and as natural as possible, which is not always possible, for example, when shooting HDR.
The disadvantage of graduated ND filter is their price and the fact that when shooting will have to spend time to install the entire system on the lens and its adjustment. However, the ND graduated filter will save much more time, minimizing the subsequent processing of frames.
IMAGE POST-PROCESSING
You can add the finishing touches to your picture using a post-processing program like Lightroom or Photoshop. There are many ways to correct images, and you can make them almost perfect. I usually work with layers over the sky and the foreground, adjusting them individually.
You can increase the brightness of nearby objects to convey details better, or you can highlight beautiful clouds. Some photographers convert ND Grad images to monochrome to make the movement of water even more spectacular.
SUMMARY
The key investment is not money, but time and effort spent on practice. High-quality equipment is a useful thing, but the result is determined primarily by perfect technique and a good eye.
You can apply your knowledge immediately after purchasing a filter, or better yet two. For beginners, you’ll find affordable models from NiSi, while on the opposite side of the price scale are handmade ND Grad and premium brand products.
Learn more
To improve your skills in landscape photography and learn how to take even more eye-catching images, my popular e-book, “Landscape Photography. The Complete Beginner’s Guide” will teach you the skills you need.
Regardless of your level, this ebook is written to start expanding your knowledge. “Landscape Photography. The Complete Beginner’s Guide” will teach you everything you need to start making beautiful images and take your photography to the next level.
These blog will come in handy for many photo editor. Thank you for talking about such a unique and important topic. Hopefully many have benefited.
My wide-angle lens is 72 mm and my telephoto is 82 mm – I use my telephoto a bit more than the wide-angle but interested in getting a graduated neutral density filter. Is there an adapter that I can use the filter for both lens?
Yes, of course. I recommend one in my article https://maratstepanoff.com/neutral-density-filters-guide/